
How to Build High Quality AI Games with Codex: A Step by Step Developer Guide
Posted on 06.10.2026 — Author: @Mentolatux
A practical guide for developers improving an AI-assisted game before submitting or resubmitting it to GameMonetize. A game that starts successfully is only the beginning. Players also need responsive controls, readable characters, convincing animation, meaningful levels, sound and a reason to keep playing. This guide explains how to direct Codex, review its output and turn a rough prototype into a complete browser game.
AI can accelerate development, but the developer remains responsible for the result. This tutorial is a recommended workflow, not a promise of platform approval. If a submission has been returned for improvement, use the specific review feedback alongside the checklist below.
1. Start with Codex and a realistic budget
As checked on October 6, 2026, OpenAI lists ChatGPT Plus at $20 per month, with Codex included and access to GPT-6.1 Sol and GPT-6 Luna. Availability and usage depend on your account, client and rollout. This is a subscription with usage limits, not unlimited development or a guaranteed finished game for $20. API-key usage and external asset or music services can introduce separate costs. Check official pricing before subscribing.
Use GPT-6 Luna for clear, focused tasks: adjusting one menu, implementing one enemy behavior or fixing a specific collision bug. Use GPT-6 Sol, or GPT-6.1 Sol when available, for more complex gameplay systems, architecture and coordinated changes. The official model guide recommends Luna for focused work and GPT-6.1 Sol for complex coding. Start with the default effort and increase it only when needed.
Install or open Codex, sign in, select the exact project folder and confirm the model. Keep one chat per game and write down the approved art style, controls, audio settings and remaining tasks. Give the agent access only to the assets it needs. Images and music may require dedicated tools; do not assume that a coding model alone produces finished visual or musical assets.
2. Research classic games without creating another clone
Ask Codex to recommend several older fighting or shooting games as research references. Request links, screenshots, the core gameplay loop and an explanation of how that idea could become an original 2D browser game. Compare movement, camera distance, enemy attack timing, pacing and level variety. Choose one manageable concept before coding.
Research five classic fighting or shooting games as references. Show links and explain their mechanics. Propose an original 2D concept for each with a new world, cast and title. Do not copy their assets, story or branding. Wait for me to choose a concept.
A useful direction might be a waterfront brawler with grabs and improvised weapons, a tactical facility shooter with cover, or a rooftop action game with ricochets. Define what makes your version distinctive rather than reproducing every scene of an existing game.
Choose an original title and keep an asset-rights record
Do not assume that adding a subtitle to a famous franchise name makes a release safe. An abbreviation such as GTA can still be a brand identifier. Generic words can help describe a genre, but they should not create confusion about who made the game. Use a distinctive title, original logo, characters and listing artwork.
Copyright protects original expression such as artwork and recordings; trademarks identify the source of products and services. Copied assets can lead to copyright complaints and takedowns, while confusing branding can raise separate trademark concerns. See the U.S. Copyright Office overview and USPTO explanation. Renaming a file or asking AI to modify an asset does not establish permission.
Keep a small register for every asset: creator, source URL, license, permitted use and any attribution requirement. Use work you created, commissioned or properly licensed. A folder of extracted commercial game sounds is not automatically a usable commercial library.
3. Write a short game brief and build one complete level
Specify the genre, setting, player abilities, controls, camera, win condition and intended difficulty. For this workflow, target ten levels and a 4:3 presentation at 800×600, with 1600×1200 as a sharper rendering option. Fit the view proportionally into other browser sizes. Keep the player large enough to read clearly; increasing resolution alone cannot repair low-detail artwork.
Build one complete first level before expanding the campaign. It should already contain the approved player, a finished background, two enemy types, collisions, combat effects, music, sound, pause, a checkpoint and an exit. Test that level yourself. Expanding an unfinished prototype usually spreads the same defects into every map.
Build level one as a complete quality sample. Include movement, combat, one checkpoint, two readable enemies, a finished environment and the full audio mix. Give me a working preview link. Do not expand to ten levels until we approve this sample.
4. Create detailed characters that work at gameplay size
Give the image tool an original character brief: age range, silhouette, proportions, clothing, weapon, material details, lighting and viewing angle. “Make it realistic” is too vague. For a 2D game, aim for believable anatomy and consistent illustrated detail, with a silhouette that remains readable against the map. Photorealism is optional; visual consistency is essential.
Create an original adult waterfront fighter for a 2D side-view game. Use believable anatomy, worn work clothing and detailed hands and face. Keep the silhouette readable at 800×600 gameplay scale. Provide a transparent-background reference with a neutral pose and consistent proportions. No text, logos or famous characters.
Approve one reference before generating animation poses. Preserve head, torso, pelvis and limb dimensions across the set. Keep the same clothing colors and prop design. Inspect hands, fingers, weapon alignment and transparency. Never accept stretched artwork merely because every exported frame has the same PNG dimensions.
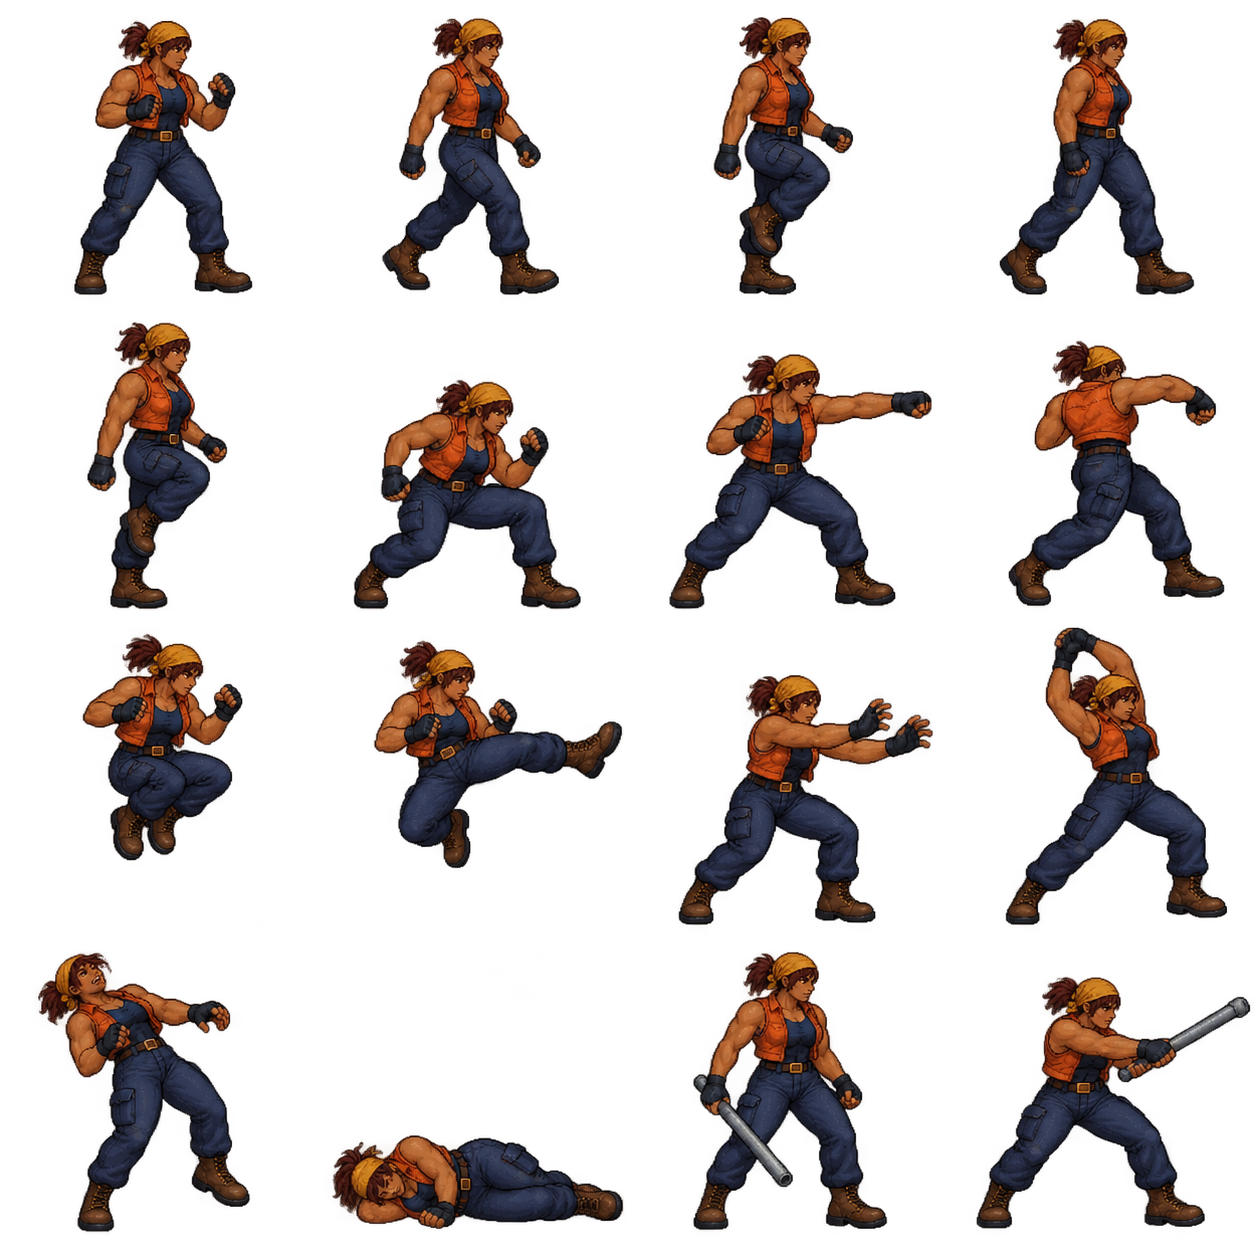
Visual review: compare the character at actual game size, not only as a large promotional image. Can you distinguish the face, stance, weapon and damage reaction? Does the player remain readable against both bright and dark backgrounds? The examples added to this guide should be evaluated for these features, not treated as permission to copy their artwork.
5. Finish animation before multiplying the cast
Complete the main player first: idle, alternating walk and run cycles, jump, landing, attacks, weapon states, damage, recovery and death. Check both facing directions. Add grabs, throws, blocking or dodging if the design needs them. Run speed should match displacement; feet should not slide while the character travels.
Share the frame canvas, pixel density and ground pivot across each character set. Allow crouching and jumping to change silhouette height naturally. Do not resize every pose to fill one bounding box. Weapons need stable hand anchors and consistent dimensions through pickup, carry, attack and drop.
Review the complete player animation in gameplay. Fix anatomical changes, foot sliding, weapon drift and abrupt transitions. Show both facing directions. Preserve the approved proportions rather than applying guessed scale multipliers to individual poses.
Only after the player passes this review should you produce enemies. Give each enemy a clear role and animation language: a slow heavy attacker, a ranged opponent or a fast close-range fighter. Different artwork alone does not make different gameplay.
6. Build backgrounds for the camera, not just for a thumbnail
Describe the environment as carefully as the character: architecture, materials, time of day, lighting, foreground objects, collision surfaces and usable space. In a waterfront map, weathered concrete, loading equipment, pipes, dock structures and distant buildings can tell the story. Keep the playable lane clear and separate enemies from the background through contrast.
Create an original detailed industrial waterfront environment for a 2D brawler. Match the approved side-view camera and character scale. Include readable walking space, coherent lighting and modular sections for a long level. Preserve proportions and avoid a single low-resolution image stretched across the map.
Build long maps from coherent sections or tiles with clean joins. Source artwork must contain enough detail for the largest output and camera magnification. In this workflow, static props, platforms and background sections share world coordinates and the same camera translation. They should not slide independently as the camera moves.
Check the final composition at 800×600 and 1600×1200. Avoid blur or sharpening as a substitute for missing source detail. Keep the original files so future changes do not depend on repeatedly recompressing a small export.

Compare different environments at the same camera scale
 Test enemy contrast against both shadow and light.
 new background alone does not create a new level.
Ask AI for separate environment sections and foreground props, plus a map layout showing walkable surfaces, collision bounds, entrances and exits. Align the camera and lighting before generating a whole campaign. Decorative shadows must not suggest platforms that the player cannot use.
7. Make shooting and fighting feel responsive
A shot should combine a prompt weapon response, muzzle flash, recoil, a readable projectile or trace, a matching sound and a target reaction when damage is accepted. A punch needs anticipation, contact, recovery and an impact effect synchronized to the actual hit. Small camera shake or brief hit stop can reinforce contact, but excessive shake and flashes make the game harder to read.
Do not generate false hit effects against invulnerable or hidden targets. Blood, sparks or dust should match the material and the game’s intended audience. Stronger lethal feedback can distinguish a finishing hit. Bound particle counts and expire particles and ground marks so long sessions do not become slower.
Synchronize attack animation, damage, impact particles and sound. Add readable recoil and enemy reactions. Use restrained camera feedback. Emit hit effects only when damage is accepted, and keep particles and marks bounded and temporary.
Visual example: environment, shot, damaging hit and explosion
 AI-generated concept illustration for this tutorial, not a screenshot from a published game. These panels explain visual targets. The developer must implement and test their timing, hit logic, animation and sound.
- Environment: keep the player, enemy and walking surface readable before adding particles. Detailed scenery should support the action.
- Shooting: anchor a short muzzle flash to the weapon barrel. Match recoil and firing audio to the firing event. A tracer shows direction; it must stop at the first valid collision, not pass through walls or continue behind the camera.
- Blood and hit feedback: place a brief red spray at the actual struck point only after damage is accepted. Match the enemy's flinch and impact sound to that event. Use stronger finishing-hit feedback where appropriate, with no false spray during invulnerability. Expire small ground marks and offer reduced effects if needed.
- Explosion: combine a fast bright core, outward sparks or debris and a slower smoke tail. Apply damage once through the combat system, to eligible visible targets. Keep the effect local and avoid a full-screen opaque fireball that hides the player.
Build effects as animation, not static stickers. Request a consistent transparent sprite sequence or a particle setup with an explicit spawn point, direction, lifetime and maximum active count. Muzzle flashes usually need a very short life; smoke should fade more slowly. Profile the busiest encounter instead of assuming more particles mean better quality.
Create original 2D combat effects matching our approved artwork: muzzle flash, metal spark, dust impact, non-graphic blood hit and barrel explosion. Keep scale, lighting and frame alignment consistent. Wire each effect to its real gameplay event, pair it with a licensed sound, expire it automatically and show me a manual preview. Prevent hidden targets, walls and invulnerable characters from producing false damage feedback.
Human review: fire into empty space, a wall, a visible enemy and an invulnerable target; compare sound and visuals. Trigger overlapping explosions and verify that the player remains readable, damage is fair and particles clear. A concept image cannot verify any of these behaviors.
Give enemies readable behavior
Use an observable cycle: notice the player, approach or take position, wind up, attack and recover. Give the player time to react. Enemies should use authored entrances and positions rather than teleport into the camera. Difficulty should come from patterns, positioning and combinations, not unavoidable instant damage.
For this design, enemies and bosses may attack or receive weapon damage only while visible in the actual gameplay camera. Apply that boundary to bullets, aim assist, grenades, area damage and chained explosions. Retire projectiles outside the visible playfield. Test entry, exit and re-entry at both edges; a large simulation buffer is not the visible screen.
8. Build a useful local audio library
Ask Codex to request your audio folder before inventing weak substitute sounds. Organize it into Music, Weapons, Impacts, Footsteps, Ambience and UI. Use owned or licensed source packs, recordings and generated clips. Keep source and license documents beside the files. Let the agent inspect duration, clipping and format, but listen yourself to important selections.
Ask me for my audio-assets folder. Find suitable weapon, impact, footstep, ambience and UI clips. Present the strongest candidates and their source/license information. Copy only selected clips into this game and record their source paths and usage. Preserve the original library.
Layer sounds where useful: a gun mechanism, shot body and short tail can provide more character than one thin beep. Vary repeated footsteps or impacts subtly. Do not play every effect at maximum volume, and avoid stacking identical shots into a harsh wall of sound.
Every published game must contain its own required audio copies. It must not depend on an absolute path on your laptop. Retain reusable selections in the shared library for future projects, with a catalog identifying what each game uses.
9. Compose music with direction and review the mix
Research the broad instrument palette, rhythm and atmosphere of the reference genre, then create an original composition. Do not request a near-copy of a famous melody or reuse its recording. For a small browser game, a 10–20-second instrumental loop can be an efficient first target, provided it has a clean loop boundary and enough movement to avoid feeling like an unfinished test tone.
Compose an original 15-second instrumental loop for an arcade waterfront brawler: energetic drums, bass and a memorable short brass phrase, with room for impact sounds. No copied melody or vocals. Deliver a clean looping file and a listening preview before integration.
For a horror shooter, sparse pulses, low textures and distant ambience may work better than constant loud drums. For fast rooftop combat, a controlled electronic groove can support the pace. Each game needs its own musical identity.
- Suno: original music generation; check the commercial rights for the plan and the conditions at the time the track is generated.
- ElevenLabs Music: music creation and editing. Its page specifies tier-dependent rights and restrictions involving Studio Games; confirm that the license covers your use before choosing it for a release.
- ElevenLabs Sound Effects: describe the action, material, duration and ambience required for a generated effect. Check the applicable commercial terms.
- Kenney: asset packs on its asset pages are CC0; inspect the included license and audition the relevant audio pack.
In our working reference, music starts at 26% and effects at 80%. These are starting settings, not a universal loudness standard: different files and mixers produce different results. Keep music behind combat and speech, prevent clipping, provide separate sliders and preserve the player’s saved preferences. The developer should audition both headphones and ordinary speakers at reasonable listening volume.
10. Use a clean menu and put Play directly into the map
The main menu can be simple: a clear title, one prominent Play button, Settings and Info. Include Continue when saved progress exists. After the required advertisement, Play should enter the map without a sequence of unnecessary cards or forced tutorial panels. Keep optional instructions in Info, with brief contextual hints only when useful.
Keep health, objectives and essential status compact at the top. Put touch movement near the lower left and action buttons near the lower right. Use transparent or lightly outlined controls instead of a large opaque background panel. Keep hit areas practical, respect safe areas and ensure controls do not cover enemies, exits or interaction points.
Create a clean responsive menu with Play, Settings and Info. Play enters the map after the SDK ad returns. Keep the HUD compact at the top and transparent touch controls along the bottom. Remove oversized panels, intrusive tutorial overlays and forced rotation blockers. Preserve readable labels and usable touch targets.
Keyboard and touch should both support every required action. Do not advertise mobile support simply because a page fits on a phone.
Example: controls without a background panel

Render controls as live HTML text, not a screenshot of a control bar. The container should have background: transparent, no large border and no backdrop blur. Optional thin key outlines and a small text shadow preserve readability. Display only actions implemented by your game; do not copy extra commands from the reference.
This example is a keyboard legend, not functional touch buttons. pointer-events: none prevents the legend from blocking input. For mobile, use actual labeled buttons with transparent backgrounds, pointer-events: auto, roughly 44–48 CSS-pixel or larger hit areas and safe-area offsets. Connect pointer down/up/cancel to the input system, support simultaneous movement and attack, and clear held inputs when focus is lost. Keep visible controls within the fitted 4:3 game view.
Replace the opaque control strip with compact key-and-action labels over the game, using transparent backgrounds and subtle text shadows. Keep the HUD small at the top and the controls near the bottom safe area. For touch, use real transparent buttons with comfortable hit areas, multi-touch and correct press/release handling. Do not cover enemies or objectives. Show desktop and mobile previews for my review.
11. Give all ten levels a purpose
Use a campaign table before authoring maps. For example: level 1 teaches the core actions; level 2 adds a ranged enemy; level 3 introduces vertical routes; level 4 combines cover and hazards; level 5 provides a mid-campaign boss; level 6 changes the environment; level 7 tests a new enemy combination; level 8 adds an objective under pressure; level 9 prepares the final confrontation; level 10 resolves the campaign with a boss and ending.
This is a structure to adapt, not a demand that every game follow the same formula. Each level should have its own layout, encounters and reason to exist. Balance enemy counts, health, supplies and checkpoints so a new player can learn without being destroyed immediately.
Plan ten distinct levels with an objective, layout feature, enemy combination, checkpoint and completion condition for each. Preserve the approved quality of level one. Avoid ten copies of the same arena with increasing enemy counts.
12. Test every level yourself and give Codex specific feedback
Request a verified playable HTTP preview. Complete all ten levels manually; a syntax check cannot prove that an exit is reachable or a boss is fair. Test keyboard and touch, pause, restart, death, checkpoints, saving, level transitions and the ending. Resize the browser and check that the game remains readable and controls stay aligned.
Report problems precisely: “In level 4, the player catches on the second stair after dodging right,” or “The rifle sound masks the damage cue.” Add a screenshot or short recording when useful. Ask Codex for a focused correction and retest the affected behavior. Continue this loop until the defect is resolved; do not accept “professional quality” as a substitute for evidence.
Stop unused previews and audio after testing. Use bounded tests and close only the tabs and processes created for those tests. Do not keep multiple games running in the background unnecessarily.
13. Integrate monetization and submit the actual final build
Use the correct GameMonetize SDK for HTML5 or Unity WebGL and the exact Game ID for that listing. Never reuse another game’s ID. Request ads at supported, appropriate user actions. During an ad, hold simulation and input and mute game audio; restore the previous state after the SDK callback, including saved volume settings and any existing pause or slow-motion state.
Keep More Games in a stable menu location and use the intended destination. Avoid buttons that float over important gameplay. Follow the current GameMonetize SDK guidance and use the platform’s verification flow.
The upload ZIP needs index.html at its root and all required runtime files. Remove editor caches, unrelated sources and unused asset libraries. Verify that the archive contains the latest fixes; editing the source project does not automatically update an old build.
Prepare an honest description, accurate controls, relevant categories and tags, and clear listing images. Promotional artwork should reflect the actual characters and experience. Include gameplay screenshots so reviewers can compare the promise with what players receive.
Published Codex-assisted examples to explore
The developer supplied these published games as examples of Codex-assisted work. Follow the links to inspect their playable versions. They are examples to study, not a claim that every game meets every checklist item or that its branding is legally cleared. Some existing titles refer to franchises; new submissions should follow the original-title guidance above. Judge motion, effects, audio and controls in gameplay.
The following images are official listing thumbnails, not gameplay screenshots. They illustrate character presentation, visual themes and promotional composition; they do not demonstrate animation or audio quality.
Alien Quarantine

Steel Directive: City Zero

Hellforge: Demon Protocol

Final Fight: Harbor Justice

Cadillacs: Dino Riot

Contra: Jungle Breach

Streets of Rage: Neon District

Double Dragon: Broken District

A short starter prompt for Codex
Recommend five classic fighting or shooting games as research references, with links and images. Propose original concepts and titles without copied branding or assets. After I choose, ask for my assets and audio folder. Build one complete level for approval, then ten varied levels. Use detailed consistent characters, smooth animation, high-quality backgrounds, readable combat effects and licensed audio. Present original music for approval. Keep Play, Settings and Info clean; Play enters the map, with compact HUD above and transparent touch controls below. Enemies attack and take damage only in the actual visible viewport. Provide working preview links, record real checks and help me test every level. Use the correct GameMonetize SDK and exact Game ID. Do not publish until I request it.
Before resubmitting: the developer’s quality checklist
- The title, characters, artwork and audio have a clear original or licensed basis.
- The gameplay looks consistent with the listing images.
- The player’s full animation set works at actual camera scale.
- Backgrounds are detailed, coherent and stable as the camera moves.
- Attacks, damage reactions, effects and sounds are synchronized.
- Enemies have readable attack patterns and fair recovery opportunities.
- All ten levels have been completed and checked by a human.
- Keyboard, touch, checkpoints, pause, restart and saving work.
- Music and effects are present, balanced and separately adjustable.
- Menus and controls do not obstruct the action.
- The SDK uses the correct Game ID and restores the game correctly after ads.
- The ZIP and listing reflect the current build and the review feedback.
When a reviewer identifies missing audio, weak animation, confusing branding or unfinished gameplay, use that feedback to improve the game itself. A new thumbnail or a renamed ZIP will not correct those problems. Codex can help you iterate, but your testing and approval are what turn the generated prototype into a game worth playing.
Play and test the example games
Open an example below to review its characters, environment, controls, combat feedback and audio in gameplay.
- ▶ Play / Test game: Alien Quarantine
- ▶ Play / Test game: Steel Directive: City Zero
- ▶ Play / Test game: Hellforge: Demon Protocol
- ▶ Play / Test game: Final Fight: Harbor Justice
- ▶ Play / Test game: Cadillacs: Dino Riot
- ▶ Play / Test game: Contra: Jungle Breach
- ▶ Play / Test game: Streets of Rage: Neon District
- ▶ Play / Test game: Double Dragon: Broken District
Recommended:
GameMonetize Partnership
Join our platform and earn revenues from games!
Monetize your HTML5 game through in-game advertising! You will develop your awesome HTML5 games, integrate our API, and we will take care of the publishing and monetization part.
Join our game distribution network and enjoy huge benefits and high earnings!
Join over 19500+ satisfied developers and publishers which trust us!